Ingredients
Method
Coconut Chocolate Custard
- In a saucepan, heat the coconut milk over medium heat until it just begins to boil. Stir occasionally to prevent scorching.
- Meanwhile, in another saucepan or heatproof bowl, whisk together the egg yolks, sugar, cornstarch (cornflour), and salt until smooth and lump-free.
- While whisking continuously, slowly pour in about one-third of the hot coconut milk. This step tempers the egg yolks and prevents scrambling.
- Add the remaining hot coconut milk and whisk until fully combined.
- Place the saucepan over medium-low heat and cook while whisking continuously. Make sure to scrape the bottom and sides of the pan to avoid lumps.
- Continue cooking until the custard thickens slightly. The consistency should remain pourable and slightly runny since it will thicken more while cooling.
- Remove from heat and immediately pour the hot custard over the dark chocolate placed in a bowl.
- Stir until the chocolate melts completely and the custard becomes smooth and glossy.
- Cover the surface directly with cling film to prevent a skin from forming. Let it cool to room temperature before using.
Coconut Cupcakes
- Preheat the oven to 180°C/350°F. Line a cupcake tray with cupcake liners.
- In a medium bowl, whisk together the all-purpose flour, cornflour, baking powder, and salt. Set aside.
- In a large bowl, beat the butter and sugar together until pale, creamy, and fluffy. This may take about 3–5 minutes.
- Add the eggs one at a time, beating well after each addition until fully incorporated.
- Add the vanilla extract and mix until combined.
- Add the dry ingredients and coconut milk alternately in 2–3 additions, beginning and ending with the dry ingredients. Mix only until combined after each addition.
- Fold in the shredded coconut using a spatula.
- Fill the cupcake liners about two-thirds full.
- Bake for 18–20 minutes or until a toothpick inserted into the center comes out with a few dry crumbs.
- Allow the cupcakes to cool in the tray for 5 minutes before transferring them to a wire rack to cool completely.
Chocolate Swiss Meringue Buttercream
- Add the egg whites, sugar, and salt to a heatproof bowl.
- Place the bowl over a saucepan containing simmering water. Ensure the bottom of the bowl does not touch the water.
- Whisk continuously until the sugar completely dissolves and the mixture reaches approximately 65°C/150°F. When rubbed between your fingers, the mixture should feel smooth without any sugar granules.
- Remove the bowl from heat and beat the mixture using an electric mixer until stiff, glossy peaks form and the bowl no longer feels warm.
- Add the softened butter gradually, one portion at a time, beating well after each addition.
- Continue beating until the buttercream becomes smooth, creamy, and stable. If it looks curdled at any stage, keep beating—it will come together.
- Sift in the cocoa powder and add the coconut cream. Beat until fully incorporated and smooth.
Assembly
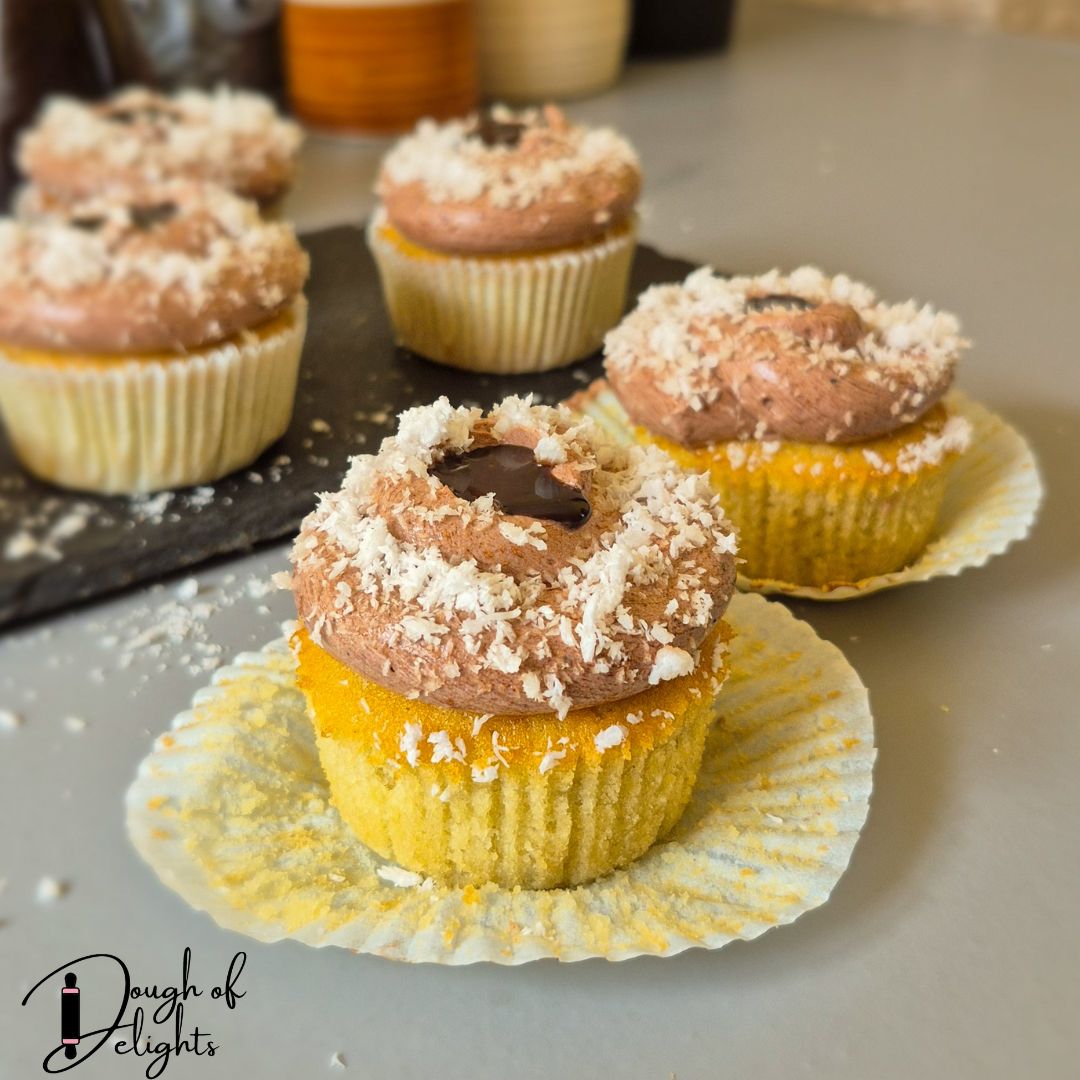
- Once the cupcakes have completely cooled, create a cavity in the center of each cupcake using a piping nozzle, melon baller, or knife.
- Fill each cavity with the cooled coconut chocolate custard using a spoon or piping bag.
- Pipe the chocolate Swiss meringue buttercream on top of each cupcake.
- Use a small spoon to create a shallow dent in the frosting.
- Sprinkle shredded coconut over the frosting.
- Pipe or spoon additional custard into the dent on top.
- Refrigerate the cupcakes for about 20 minutes before serving for the best texture and clean presentation.
Notes
Storage Tips
Room Temperature- Store for up to 1 day in a cool environment (not ideal due to custard). Refrigerator- Store in an airtight container for up to 3–4 days. Bring to room temperature before serving for best texture. Freezer- Freeze unfrosted cupcakes for up to 2 months. Thaw overnight in the fridge before assembling. Make-Ahead Tips- Custard can be made 2 days ahead and refrigerated.
- Cupcakes can be baked a day in advance.
- Frosting can be made ahead and re-whipped before use.
- Assemble cupcakes the day of serving for best texture.